(800) 682-9444
Call Now


Got a mobility scooter and wondering if you can take it on the bus? The short answer is almost always yes, but it’s not quite as simple as just rolling up to the curb. Think of it like taking carry-on luggage on a plane—your scooter needs to meet certain rules to fit safely in its designated spot.
A quick check with your local transit authority is the best first step, but we’ll walk you through everything you need to know.

Taking your scooter on public transport for the first time can feel a little nerve-wracking, but it doesn't have to be. The good news is that public buses are designed to be accessible. Laws like the Americans with Disabilities Act (ADA) ensure that people with mobility devices have every right to use public transit.
Of course, this access comes with a few conditions, all designed for everyone's safety. The system works perfectly when your scooter fits within the physical limits of the bus and its ramp. This is why knowing the rules isn't just about following them—it's about making your trip smooth, predictable, and totally stress-free.
It all boils down to a few practical things. Your local bus company has policies in place to make sure every passenger can board, ride, and get off safely. Before you head out, you just need to confirm that your scooter plays by their rules.
To help you prepare, we've put together a quick summary of the main things you'll need to check.
| Factor | What You Need to Know |
|---|---|
| Scooter Classification | Buses typically only allow Class 2 mobility scooters—the smaller models meant for sidewalks and indoor use. The larger, road-legal Class 3 scooters are usually too big. |
| Size and Dimensions | There's a designated securement area on every bus. Your scooter must fit inside this space, which is often around 48 inches long by 30 inches wide. |
| Weight Capacity | The bus ramp or lift has a weight limit, usually around 600 pounds. This number includes both you and your scooter combined. |
| Local Transit Policy | Every transit authority has its own rules. Some might ask you to get a free permit or attend a quick orientation before your first ride. |
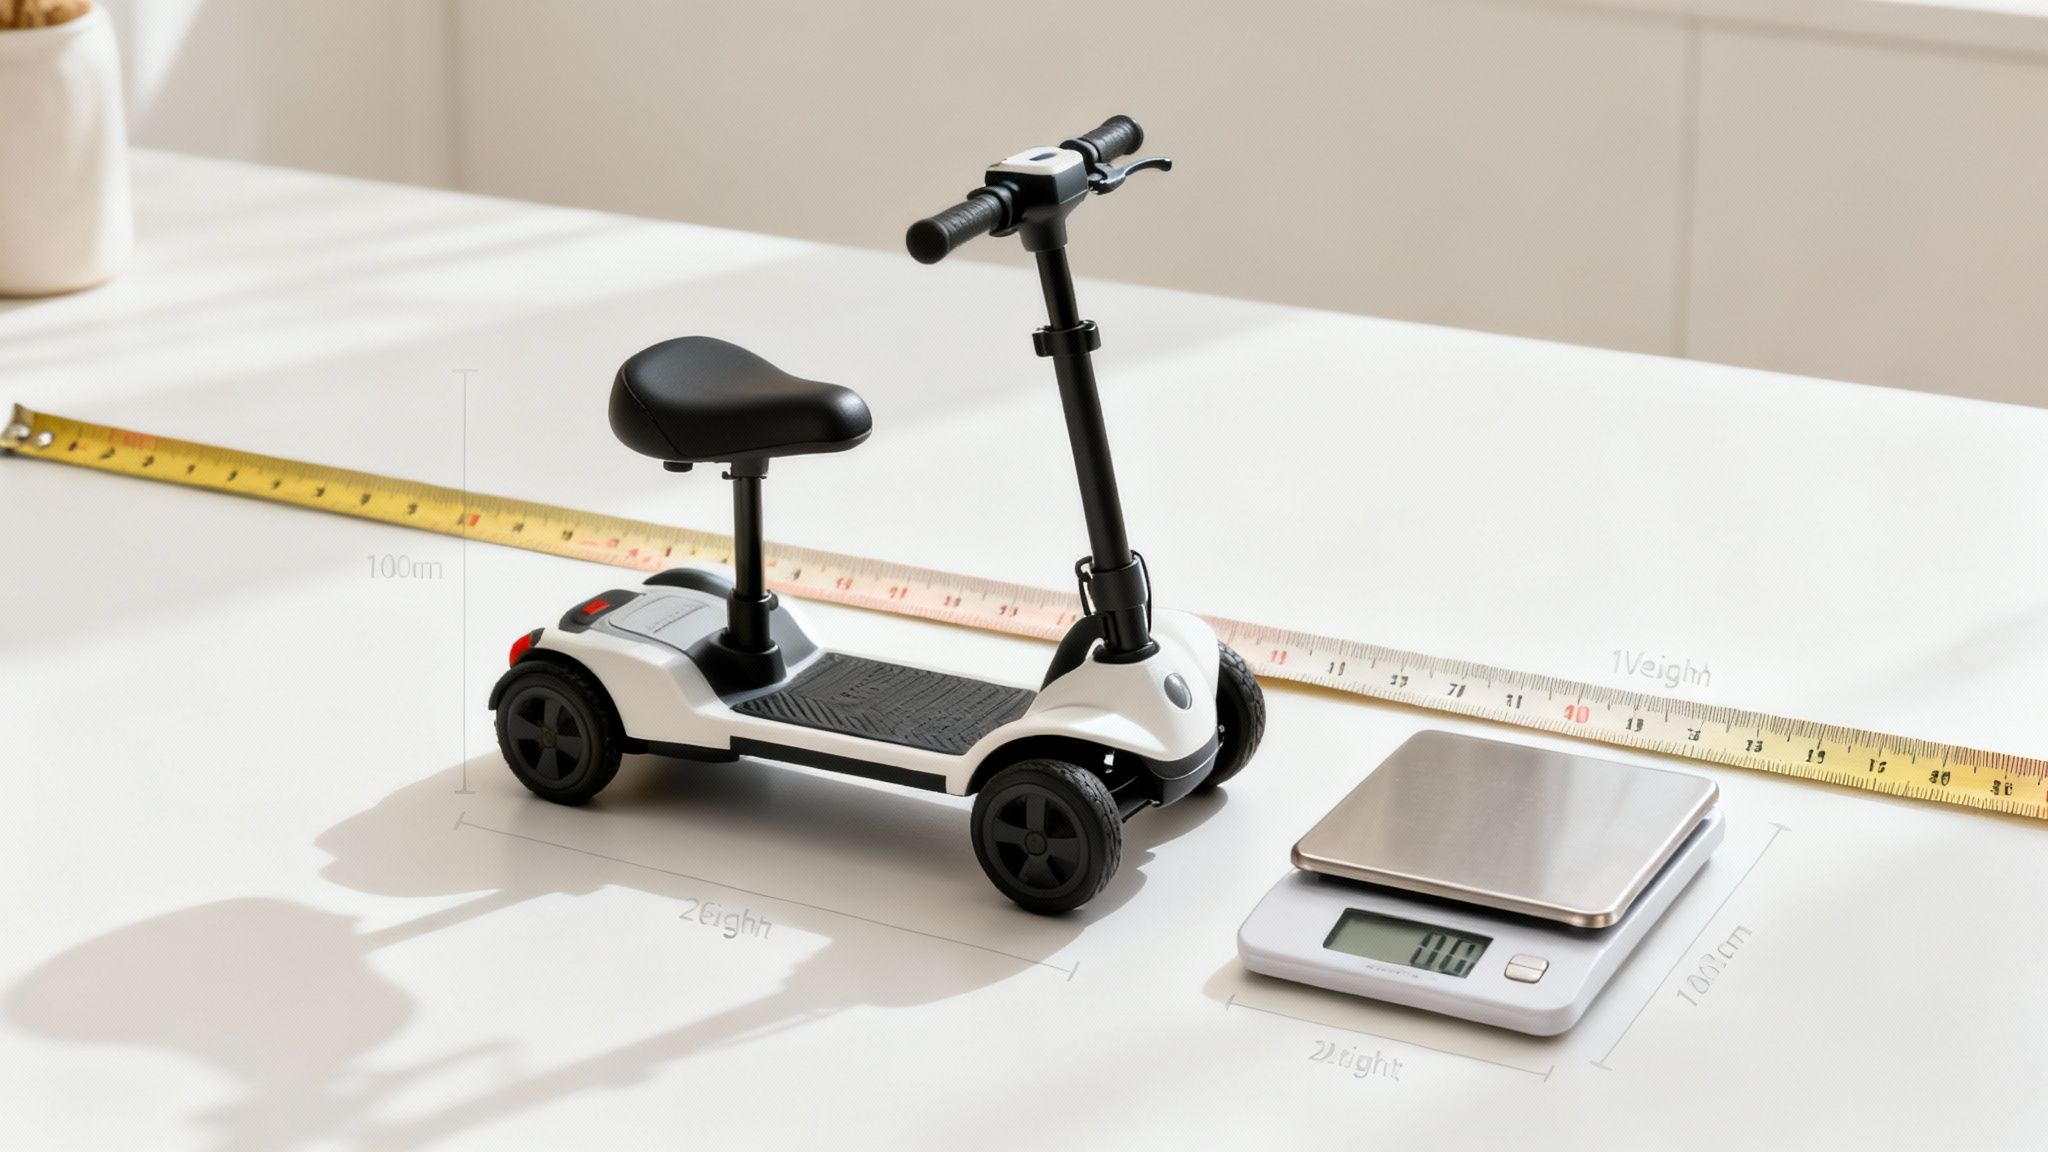
Think of the designated scooter space on a bus like a reserved parking spot. Just as a big truck can't squeeze into a compact car space, an oversized scooter won't fit in the securement area. Measuring your scooter and comparing it to the transit authority's limits is the most important check you can do before you leave.
Before you can travel with confidence, you need to understand the rules of the road—or in this case, the rules of the bus. When you ask, "Can I take my mobility scooter on a bus?" the answer is tied directly to laws designed to protect your right to access public transportation. The big one here is the Americans with Disabilities Act (ADA).
At its core, the ADA is a civil rights law. It prohibits discrimination against people with disabilities in all areas of public life, and that absolutely includes transportation. For bus travel, this means transit authorities have to make reasonable accommodations for passengers who use mobility devices.
This legal backbone is why buses have ramps, lifts, and special areas to secure your scooter. It’s your ticket to boarding, riding, and getting off the bus just like any other passenger.
While the ADA guarantees your access, it also has to balance that with practical safety and logistics. This is where you’ll run into the term "common wheelchair." It’s the official definition transit authorities use to determine which mobility devices can safely fit on their buses.
A device is considered a "common wheelchair" if it meets specific size and weight limits. While policies can differ slightly from one city to another, the federal ADA standard is pretty clear.
A common wheelchair is any three- or four-wheeled mobility device that is no more than 30 inches wide and 48 inches long (measured two inches from the ground) and weighs no more than 600 pounds with you on it.
Your scooter has to fit within these dimensions to be guaranteed a spot. Think of it like a key for a lock: if your scooter is the right size, it fits the bus's accessibility features, and the door to public transit swings right open for you. This same logic often applies to other forms of transport, which you can read more about in our guide on taking mobility scooters on trains.
Knowing your rights is empowering. It turns a potentially stressful situation into a smooth ride. The bus operator has a clear set of responsibilities to make sure your trip is safe and accessible.
Here’s what you can and should expect from the driver:
It's also important to know where their responsibilities end. Bus operators aren't required to offer personal physical assistance, like helping you move from your scooter to a bus seat or carrying your bags. Their job is to operate the bus and its equipment safely. Getting familiar with the layout of major terminals, like the Rodoviária de Guarulhos bus station, can also help you plan ahead for what you might need.
Key Takeaway: The bus driver is your partner in a safe journey. They’re in charge of the bus’s accessibility features, but you’re in charge of maneuvering your scooter on and off the ramp and into the designated spot.
There are very few reasons a driver can legally deny you boarding if your scooter meets the "common wheelchair" definition. This can really only happen if the lift is broken, the securement area is already full, or your scooter poses a direct safety threat (like a leaking battery).
This integration of personal mobility devices and public transit is only growing. The smart mobility market is on track to hit USD 215.2 billion by 2030, a clear sign of the massive investment going into creating more connected and accessible transportation systems for everyone.
Before you head out to the bus stop, the very first thing you need to sort out is whether your scooter is even a candidate for public transit. Not every scooter is built for it, and every bus has hard limits based on the equipment it uses. These rules aren't there to make your life difficult; they exist purely for the safety of everyone on board.
Think of the spot for scooters on a bus like a specific parking space in a garage. If your vehicle is too long or too wide, it just won’t fit. Simple as that. And if it's too heavy, it could seriously damage the lift mechanism. Knowing your scooter’s vital stats is step number one for a smooth ride.
While policies can vary a little from city to city, most transit systems stick closely to the standards set by the Americans with Disabilities Act (ADA). These dimensions aren't random; they’re based on the size of the securement areas and what the bus ramps and lifts can handle.
Generally, your scooter should be no more than 30 inches wide and 48 inches long. This is the standard "common wheelchair" size that buses are designed to accommodate. Anything bigger might struggle to get down the aisle or fit into the securement area without blocking exits, which is a major safety no-no.
The other magic number you need to know is the combined weight of you and your scooter. Bus lifts have a maximum capacity they can safely operate, which is typically 600 pounds. This limit is crucial for protecting the hydraulic and mechanical parts of the lift from failing under stress.
A lot of people think this limit is just for the scooter itself, but that’s a common mistake. Transit authorities always calculate the total weight—your scooter plus you. Going over this limit is one of the main reasons a driver might have to deny boarding, since overloading the lift is a huge safety risk.
Key Insight: The size and weight rules have nothing to do with your scooter's brand or model. It all comes down to one question: can your device be safely loaded, maneuvered, and secured in the designated spot on the bus?
Knowing the limits is great, but how do you figure out if your scooter is compliant? Luckily, finding your scooter's exact dimensions and weight is usually pretty easy.
Here are the best places to check:
Once you have those numbers, just compare them to what your local transit authority has listed on their website. This quick check can save you a world of frustration at the bus stop.
If you’re shopping for a new scooter, keeping these transit-friendly dimensions in mind from the start is a brilliant move. Our buying guide for the best folding mobility scooters can point you toward models that are compact, compliant, and designed for travel.
Confidence is everything when you’re trying something new. Taking your scooter on the bus for the first time can feel a little intimidating, but a bit of prep work can turn that uncertainty into a simple, repeatable routine.
Think of it like this: you wouldn't just show up at the airport for a flight without your tickets and ID. A few quick checks before you head out the door make all the difference for a smooth bus trip. It really just boils down to calling your local transit agency and giving your scooter a quick once-over.
Your first move should always be to get in touch with your local transit provider. Policies can vary from city to city, so their customer service or accessibility team is your best source for real, accurate info. You can usually find a dedicated phone number or email for accessibility questions right on their website.
When you call, have a few key questions ready. This will save you a ton of guesswork later.
Making that one phone call will clear up most of your questions and is easily the most important step you can take.
Once you know the rules, it’s time to get your scooter ready to roll. A few simple checks will prevent any last-minute headaches when the bus pulls up. This is a core part of learning how to safely transport your mobility scooter.
Here’s a quick checklist to run through before you leave:
Making public transit more accessible isn't just a local trend; it's a global one. The mobility scooter market was valued at USD 3,262.8 million back in 2026, and it's projected to keep growing. A big reason for this is that cities are being designed to better support accessible public transport, making life easier for everyone.
Travel Tip: For your very first trip, try doing a "dry run" during off-peak hours. Catching a bus when it's quieter and less crowded can make the whole experience feel much more relaxed. It’s a great way to learn the ropes without any pressure.
By breaking down your prep into these simple steps, you swap anxiety for control. You'll know exactly what to expect, feel confident that your scooter is ready, and have all the info you need for a successful ride.
Now that you've done your homework, it’s time for the main event: getting on, riding, and getting off the bus. This part can feel a little intimidating at first, but I promise, after you’ve done it a couple of times, it’ll feel like second nature. The trick is to break it down into simple, easy-to-follow steps.
Think of it like a simple dance routine. Each move has a purpose, making sure both you and everyone else on board stays safe. With a little clear communication and practice, you'll be navigating the bus system like you've been doing it your whole life.
This simple workflow shows how a little planning ahead makes your travel day much smoother.

This process flow highlights the three core steps: contacting your transit authority, checking your scooter’s readiness, and securing your belongings before you go.
Let's walk through the whole journey, from the second you spot the bus to the moment you’re back on the sidewalk. Follow these steps, and you’ll handle each part with confidence.
1. Positioning at the Bus Stop When you see your bus pulling up, make sure your scooter is positioned where the driver can easily see you. Hang back on the sidewalk, a safe distance from the curb, until the bus stops completely and the doors swing open. This gives the driver all the space they need to deploy the ramp or lift without any hassle.
2. Communicating with the Driver Catch the driver's eye and give a clear signal that you’ll need the ramp. You don't have to shout—a simple wave or nod usually does the trick. They'll deploy the ramp. Just wait until it's fully extended and sitting flat on the sidewalk before you even think about moving forward.
3. Boarding the Bus Slow and steady wins the race here. Carefully guide your scooter up the ramp. Some ramps can be a bit steep, so keeping control is everything. If you're looking for ways to practice on inclines, our guide on the best mobility scooter ramps for home use is a great place to start. Once you're on the bus, go ahead and pay your fare. If you need a hand, just ask the driver before you head down the aisle.
Once you’re on board, the next job is to find the designated securement area and get settled in. This is probably the most critical safety step of the whole trip.
You’ll usually find this spot near the front of the bus, marked with signs. It's often a space where a few seats can be flipped up to create room for a wheelchair or scooter.
Important Safety Protocol: The moment your scooter is in place, the very first thing you need to do is turn off the power. This simple action prevents any accidental movement if you happen to bump the joystick or throttle while the bus is moving. After it's off, pop the brake on.
Most buses have securement straps on hand, and the driver is trained to help you use them. If you need assistance, just ask! They’ll attach the straps to sturdy points on your scooter's frame to hold it snug during the ride. Never hesitate to ask for help—it's part of their job to make sure every passenger is riding safely.
Having accessible public transport is a game-changer for independent living. Think about it: approximately 75% of people in Europe and the United States have access to public transit, but that number drops to just 33% in sub-Saharan Africa. It really shows how vital this infrastructure is, and you can read more about it over at oliverwyman.com.
As your stop gets closer, press the signal button or just let the driver know verbally. This gives them plenty of notice to pull over smoothly and safely.
Wait until the bus comes to a complete halt before you power your scooter back on. The driver will get the ramp ready for you. Once it’s down and secure, release your brake, steer carefully down to the sidewalk, and move clear of the doors so other passengers can get off.
Even after doing your homework, you're bound to have a few lingering questions before that first bus trip with your scooter. It's only natural. Getting clear answers ahead of time can turn a potentially stressful outing into a smooth, confident ride. Let's tackle some of the most common worries people have.
Think of this as your personal FAQ for navigating public transit. By tackling the "what ifs" now, you'll be ready for pretty much anything that comes your way.
This is a huge worry for a lot of people, but the answer is actually quite simple. If your scooter is larger or heavier than the transit system's limits, the driver has to deny boarding. It's not personal—it's a strict safety rule to protect the lift and make sure there's enough room for everyone to get on and off safely.
If this happens, don't panic. Most cities have excellent backup options for accessible travel.
Of course, the best way to handle this is to avoid it altogether. Just take a minute to measure your scooter and check the local transit authority’s rules online before you even think about heading out the door.
This is one of those things that really depends on where you live. There's no single rule that applies everywhere; transit policies on permits can vary wildly from one city to the next.
Some transit systems do have a permit process. It's usually a free, one-time thing where they might have you bring your scooter in for a quick look. They'll confirm it meets their size requirements and might even give you a quick orientation on how to board and secure it. Honestly, this can make future trips way faster for everyone.
On the flip side, plenty of other transit systems don't require any permit at all. As long as your scooter fits the "common wheelchair" dimensions, you're good to go without any pre-registration.
The Bottom Line: You've got to check with your local transit provider. A quick look at their website or a phone call to their customer service or accessibility department is the only way to get the real story for your area.
Knowing what to expect from the driver—and what they expect from you—is key to a great trip. By law, bus drivers are trained to help you with the bus's own accessibility gear, but there are clear limits to their role.
Here's what a driver is required to do:
What they can't do is provide personal physical assistance. That means they can't help you get from your scooter into a seat, carry your bags, or physically push or guide your scooter. Your job is to drive your own device—up the ramp, into the designated spot, and back off again at your stop.
Clear, polite communication is your best friend here. Just let the driver know what you need with the bus equipment, and you'll be all set.
When it comes to local bus travel, the battery rules are pretty straightforward and rarely cause a problem. Nearly all mobility scooters run on one of two types of batteries: sealed lead-acid (SLA) or lithium-ion.
Good news: both are considered non-spillable and are accepted on pretty much every public transit system. The main concern for operators is preventing any kind of hazardous leak.
So, the requirements are simple:
As long as you're using the standard battery that came with your scooter and it's well-maintained, you shouldn't have any issues. If you've got a custom or non-standard battery pack, it’s probably a good idea to give your local transit authority a quick call beforehand to double-check. A simple phone call can save you a whole lot of hassle at the bus stop.
At Electric Wheelchairs USA, we believe that mobility is freedom. If you're looking for a scooter that's perfectly suited for public transit, our team of experts can help you find a compact, compliant, and reliable model that fits your lifestyle. Explore our collection of travel-friendly mobility scooters today.


Leave a comment